Partner(s): Scarlett Cheon
Day 1:
Step 1: Brainstorming for 5-10 minutes ~10 ideas
(working towards that 2 ideas/minute #goals)


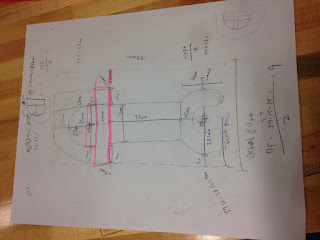
Top 2 Design ideas, Final plan (center):

We thought we could be sneaky by combining two ideas, so in designing one prototype, we could test two different designs.
Step 2: Build a prototype out of foam core (to scale). It was at this point that we realized why making the foam core model to scale was important.


Note: This step was a struggle because we realized that attempting to cut curves with an Xacto knife is not so easy. But hey, practice makes perfect, right?
Day 2:
Step 3: Create a 3D design (and drawing) using SolidWorks 2014.
We struggled with SolidWorks because it is not exactly intuitive, but after about 3 hours of "uhhhh is that button it? try that one... WOOOO YEAH!! What step is next?" we got a working model.

Step 4: Cut out our prototype out of 3/16'' Acetal using the Laser Cutter. #exciting
This cut-out took two cuts in the laser cutter.

Step 5: Test the prototype.

We ran into a problem: since we had set the inside circle's diameter to be approximately the same as the diameter of the bottle neck, the C-shaped nature of the claw side did not slide around the neck.
It also became quite clear that the shovel-ended (otherwise known as frowny-side) did not have enough contact area with the underside of the bottle cap and would break at any attempts to use it, so that idea was out. We decided to modify the claw as the functional side.
Day 3:
Step 6: Modify/Adjust the prototype.
So, we used a file (looked like a giant nail file) to file down the inside edge and allow us to actually test the prototype.


So using simple cantilever physics, we calculated that the bottle-opener would break. However, this depends purely on where the force is applied. We found that holding your hand close to the bottle, placing your thumb on top of the bottle cap, and lifting with the outside side of your hand (bringing the pinky side up towards the sky!) would result in -- in fact -- not a broken bottle-opener but an open bottle!
Engineering Analysis (justification for modifications):
- adjust the inner circle (on the claw side) so that it is wide enough to slide onto the bottle cap.
- adjust the inner circle diameter so that if it needs to be cut multiple times in the laser cutter, it will not significantly affect the fit of the claw around the neck
Cantilever equations:
δ= F(L)^3
3EI
I= b(h)^3
12
Immutable:
F (approximately) = 69N
E(Young's Modulus) = 2.6 GPa
Mutable:
L (approx, depending on how close your hand is to the bottle neck, closer is preferable) = 22.25mm
b = 13.5(pi)
h = 3/16'' or about 4.7625 mm
δ(approx)= 1.03mm
σmax = 13.1681 MPa (a factor of 5 below the yield strength!)
Step 7: Design/print the second prototype.


Note: Our added aesthetic in color decoration using Sharpie was not every long lasting because acetal is very low friction, and the design is likely to wear off soon.
Secondary Note: On testing day, opening the bottle soda was actually harder than the model bottles we used (that we had re-sealed ourselves). Perhaps it was the pressure of everyone watching us, perhaps it was that there is a significant difference in the tightness of the seal of a pressurized soda bottle and an empty one.
Reflection:
Although this first project was, at times, daunting and frustrating, I found it was also very rewarding/empowering. To go from something so simple -- a drawing on a page -- to a real life fleshed out tool is absolutely amazing. Each of the steps in the process of making a product are key and important to helping trouble-shoot in the future (aka when your first model doesn't work out.) In addition, calculating the maximum deflection and the yield strength of the model, even if they aren't exact, are great tools to help improve a model.
Notes about this product (and making others) for the future:
- is acetal the best choice of material?
- is there a way to use a thicker material (1/4'') without compromising the fit on the bottle neck?
- is there a more effective (or precise) way to cut acetal without using the laser cutter? (mass production of this tool would not be efficient if we have to trace the cut 2-4 times)
Skills learned/worked-on:
- brainstorming
- 3D modelling in SolidWorks
- basic cantilever calculations

No comments:
Post a Comment