

Original pitch:
Our goal: Help the children (ages 2 - 6) visualize how much time is left or has elapsed in an activity.
Benefit: Kids are able to understand how long is left without bothering the teacher. Conceptualize time and translate a concrete image of an amount of marbles to the abstract idea of time.
 |
| Original plan for marble releasing mechanism |
Sensing/Feedback/Control: We plan on using a weight sensor under the marble collector cup to tell the Arduino how much weight is in the cup and calculate how much time until the next marble should be released.
First prototype: So we never had a fully functional first prototype...we divided our problem into many subtasks and tackled them apart and then together.
 Task 1: Come up with some sort of mechanism that releases only one marble. We started by using the lego tracks and small t-shaped pieces. One of the main problems tackled with this task was creating a slot and opening hole large enough for only one marble to be released. (We encountered some problems with variability in the size of different marbles, ie the blue and black marbles were slightly larger.)
Task 2: Find a way to keep the marbles sorted for easy resetting at the end of the day. Given the particular Arduino and Bricktonics shield we were accustomed to working with, we were limited to two motors, thus we had the axel for the top and bottom marble holders connect to the same motor.
Marble holders/tubes were at a 1-to-1 ratio, so to remain sorted by color regardless of whether the activity has elapsed or not. (Red marbles at the top will funnel into a tube at the bottom, still sorted)
 Task 3a: Modify the track so that it can be flexible and rigid enough to attach the velcro without getting deformed. We solved by sewing the under armor headbands to the lego track. We also added a second track to each rotational piece, to allow for more control in moving and support for each marble tube (rather than only having only one velcro attachment at the bottom).
 |
| (top) |
Task 3b: Use Solidworks to model a cutout of a piece of Delrin to be placed under the marble holders to reduce the friction the marble holders have as they are rotated around.
 |
| (bottom) |
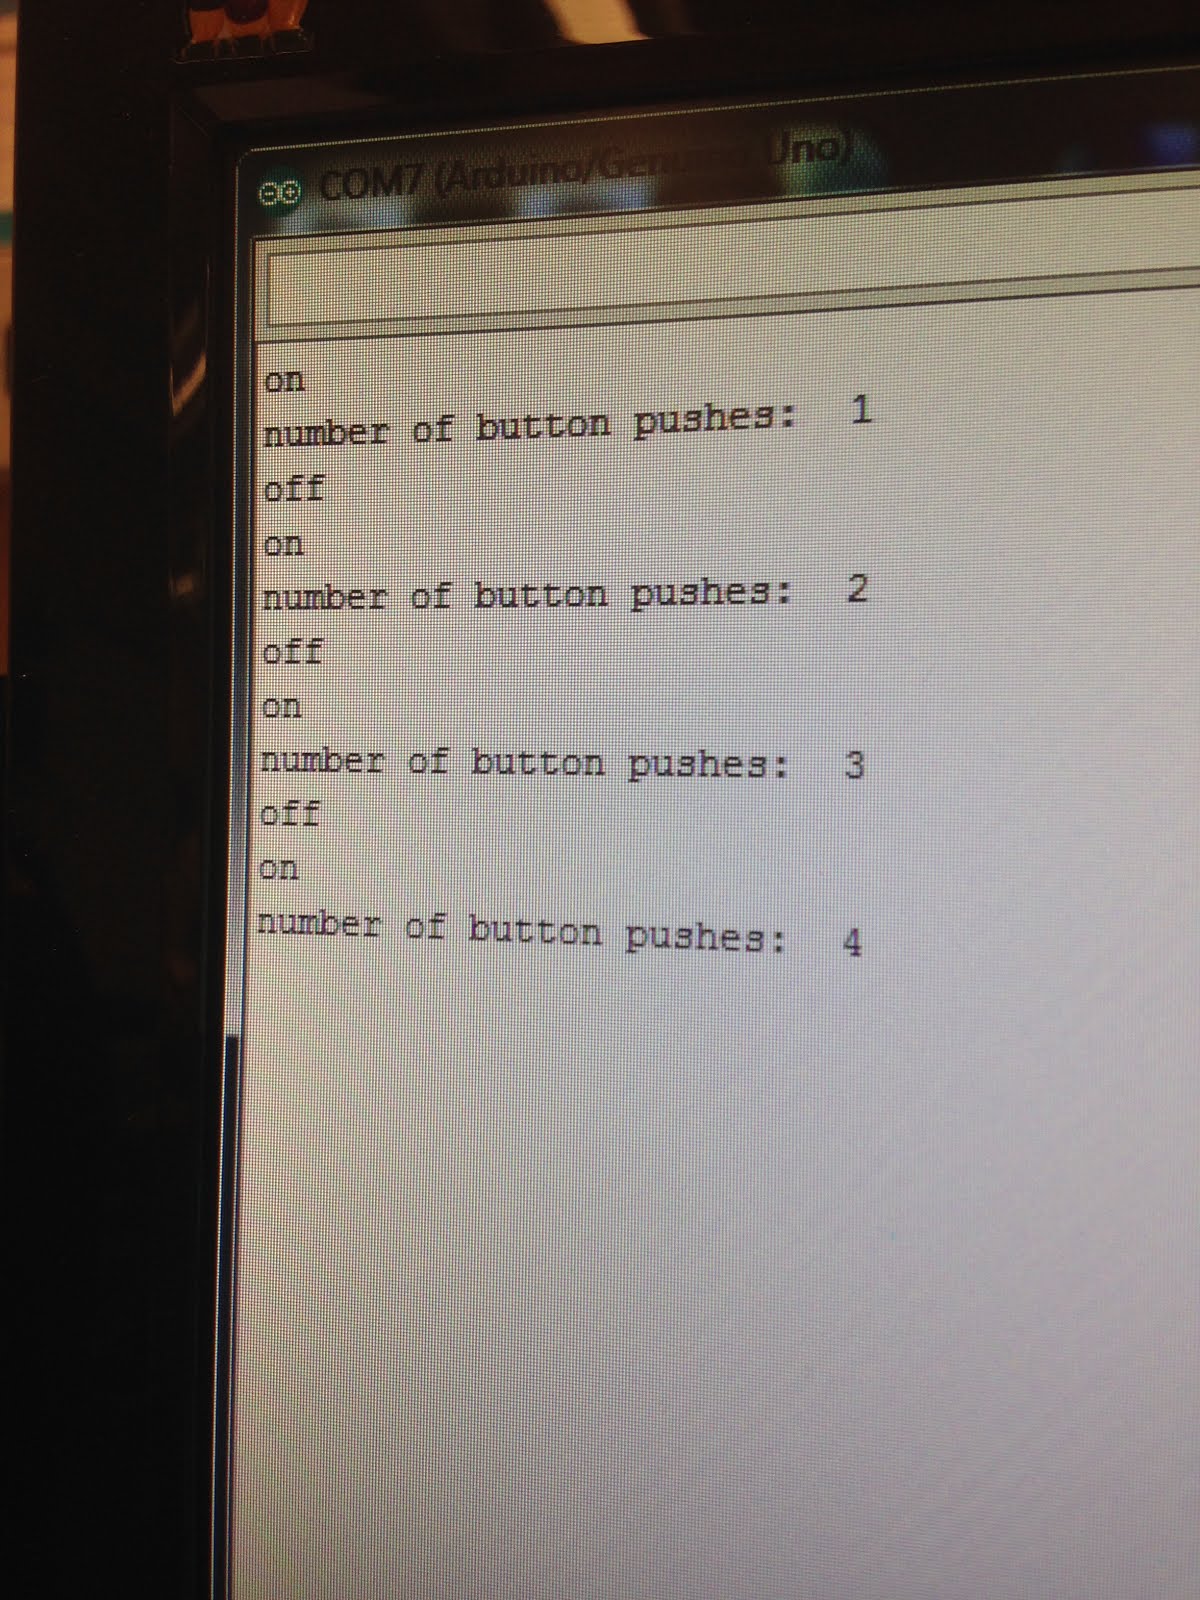 Task 4: Get the pause and fast forward button to work. In the end, the pause button ended up being a set time delay (since, due to the way the delay function works, the arduino effectively freezes for the specified amount of time, and is not checking for a change in other variables.) The fast forward button works, by sensing if there has been a change in the states of the bottom (high or low voltage) and if it has, incrementing a counter that runs the release of one marble. So, the number of times you have pressed the fast forward button is how many marbles will be released.
Code used for checking if the status of a button has changed: here!
Final Code for the demo behavior(shorter delays) of our final prototype:


Task 5: Put it all together! Last couple (okay, maybe a lot) of iterations to get to the final product!!
One of the last couple of things we had to work on was the attaching a funnel to where the marbles are released and into the marble tubes at the bottom. After many attempts to attach one (and talking to Amy and Xi Xi), we decided we needed to find a better way to consistently get the marbles into the tubes. After some brainstorming, our plan of action was to try reducing variability in where the velcro attaches the tubes and to have smaller funnels on top of each individual marble tube.


We started the same way we did with all problem solutions: wandering around the room and looking for a new way to increase the likelihood of the marble making it into the tube. First we started with aluminum foil (which XiXi commented was a bit frail), and ended with paper funnels. After fighting to attach the larger upper funnel, we tried losing it all together. We remade the individual funnels so that they were taller and more likely to catch the marbles, and hot glued them to the individual marble tubes.
The other thing we worked on was trying to reduce the variability in where the marble tubes were placed back onto our device (try and ensure it attaches to the same place every time), so we tried to reduce the size of the velcro patches on the under-armor head bands. However, as we did a lot of testing, the batteries in the battery pack powering the Arduino and the two motors started to run down. This created a lot of variability in how much the marble holders turned with each rotation. In addition, the weight of the marbles in the marble tubes created problems with how much our poor one motor could turn both the top and bottom gears. In short, we had some trouble with getting the motor to turn both the top and bottom marble tubes a consistent amount, so occasionally marble doesn't make it into the marble tube. No matter how much fine-tuning and adjustments we made to the amount of time and speed the marble holder motor should turn could completely remove the problems we were encountering.
Although this was our final project, it still has many ways that it could have been improved. Given the time frame and how much time Katrina and I did put into this project (at least 65 hours!), I couldn't be more proud of how it turned out (flaws and all). There is and always will be room for improvement. Overall, we were able to stay well under our budget of $50 for outside materials, we only ordered the plastic tubing and the marbles, coming to a grand total of $32.61 however, you must keep in mind we didn't spend money on the Arduino, delrin, motors, legos, and light sensor. If we were going to make a MC Time 2.0, we could try working with a color sensor(costs about $40 so for v1 we decided to work around this constraint) and maybe one long flexible tube at the top, that way the second motor would only have to deal with rotating the marble tubes at the bottom. That marble timer would be a bit more complex in that it would be actively sorting the marbles rather than maintaining the sorted marbles, however it might have a lot less problems overall.
 |
| (final poster) |
Our goal: Help the children (ages 2 - 6) visualize how much time is left or has elapsed in an activity.
Benefit: Kids are able to understand how long is left without bothering the teacher. Conceptualize time and translate a concrete image of an amount of marbles to the abstract idea of time.
Mechanism: A motor and Arduino/bricktonics shield to control the marble releasing mechanism gears and a track. In addition, we used a second motor to control the mechanism for rotating the marble holders.
Sensing/Feedback/Control: We used a light sensor under to tell the Arduino whether there were marbles that still needed to be released in the current activity. We also used sensing in checking the status of the button. Our entire device used bang-bang control, either a marble needed to be released or not, the marble holders needed to be rotated or not.
Here are some final close-ups on our project. The final picture includes the cardboard cover that reduces the distraction and attention to the device. The two arrows point to the current activity being run through. The marbles in the top window show the activities that have not occurred, the bottom show the sorted activities that have elapsed.


Thank you for reading! I really enjoyed the blogging process and I hope you enjoyed reading my blog! Maybe I'll start up another one someday!


I wish I could say that no Katrinas or Jennifers were harmed in the marking of this project, but that would be a lie. Hot glue is very hot.
